Continue Searching if You Find a Loop Peoplesoft
Creating Application Engine Programs
An Application Engine program includes a logically ordered set of sections, steps, and actions. An executable program must contain at least one section, called MAIN, used to identify the starting point of the program; it should contain at least one step; each step should contain at least one action.
This chapter discusses how to:
-
View Application Engine programs.
-
Filter view contents.
-
Print program and flow definitions.
-
Create, open, and rename programs.
-
Copy or move program elements.
-
Test Application Engine programs.
-
Set program properties.
-
Add sections.
-
Add steps.
-
Specify actions.

 Viewing Application Engine Programs
This section discusses how to:
-
Use Definition view.
-
Use Program Flow view.
-
Switch between Definition and Program Flow views.
-
Use the Refresh option.
Using Definition View
You use Definition view to create definitions within a defined hierarchical structure, in which nodes represent the definitions. A node is the visual representation of a section, step, or action that you can select, collapse, modify, and so on.
The sections that appear in Definition view do not necessarily appear in the order that they execute. To see the actual order in which the sections execute, switch to Program Flow view.
Besides using the mouse, you can navigate in this view using the following keyboard combinations:
-
Press Ctrl+Home to scroll to the top of the program definition and select the first node.
-
Press Ctrl+End to scroll to the end of the program definition and select the last visible node.
-
Press Tab to move from the currently selected field to the next updateable field.
-
Press Ctrl+Down Arrow to move from the currently selected node to the next node.
-
Press Ctrl+Up Arrow to move from the currently selected node to the previous node.
The following illustration shows Definition view:
Definition View Pop-up Menu
The following table describes each item you see when you right-click a Definition view window. Certain menu items are enabled only when a particular definition is selected.
| Menu Command | Description |
| View PeopleCode | Launches the PeopleCode Editor with the appropriate PeopleCode loaded. Enabled when a PeopleCode action is selected. |
| View SQL | Launches the SQL Editor with the appropriate SQL loaded. Enabled when an action containing SQL is selected. |
| View XSLT | Launches the SQL Editor with the related Extensible Stylesheet Language Transformations (XSLT) text loaded. Enabled for Transform Only program types only, when an XSLT action is selected. |
| Cut | Removes the selected item and copies it to a clipboard. Here, the word clipboard refers to a PeopleTools-only repository for sharing PeopleTools objects. You cannot copy or paste into another program. |
| Copy | Copies the selected item. |
| Paste | Pastes the contents of the PeopleTools clipboard (the most recently cut or copied item) to the current location of the cursor. |
| Delete | Removes the currently selected node from the program definition. |
| Refresh View | Refreshes the current view and reorders the definition objects as necessary. |
| Show Comment | Reveals the comments associated with the selected definition object. |
| Insert Section | Inserts a new section into the current program, at the place where the cursor is positioned. This option is enabled only when you have MAIN or another section selected. |
| Insert Step/Action | Inserts a new step and action within the currently selected section. This option is enabled only when you have a section or a step selected. |
| Insert Action | Inserts a new action within the currently selected step. This option is enabled only when you have a step or action selected. |
| Jump to This Program Flow | Switches to the Program Flow view with the first occurrence of the currently selected definition in focus. |
| | Displays the print dialog box for the definition view. |
| Insert Section Into Project | Applies to sections. Inserts the currently selected section into the current project. |
Using Program Flow View
Program Flow view is a read-only view that shows the expected sequence of steps to be executed at runtime for the program you are developing. The following illustration shows Program Flow view:
You can control the amount of detail that appears for each definition by clicking it to expand to the next level. You can also view the SQL or PeopleCode in the lower (splitter) window area by clicking on the lower window.
If a primary step node (one that is not the result of a section call) is selected, the Print Options dialog box permits either the printing to begin at that step node or the printing of the entire program. However, if a secondary step node (one that is the result of a section call), a secondary action node, a call section action node, an SQL node, or a PeopleCode node is selected in the Program Flow view, the Print Options dialog box only permits the printing of the entire program.
To display the pop-up menu for a node, right-click the node. You do not have to select the node first.
You can also display the comments associated with definitions by selecting View, Show All Comments, or for a particular node, right-click and select Show Comment.
You can double-click SQL or PeopleCode statements to launch the editors.
Program Flow Pop-up Menu
The following table contains each pop-up menu item in Program Flow view.
| Menu Command | Description |
| View PeopleCode | Launches the PeopleCode Editor with the appropriate PeopleCode loaded. Enabled when a PeopleCode action is selected. |
| View SQL | Launches the SQL Editor with the appropriate SQL loaded. Enabled when an action containing SQL is selected. |
| Refresh View | Refreshes the current view and reorders the definition objects as necessary. |
| Show Comment | Reveals the comments for a single definition object that appears in the Program Flow view. |
| Jump to This Definition | Switches to the Definition view with the first occurrence of the currently selected definition object in focus. |
| | Launches the print dialog box for the program view. |
Switching Between Definition and Program Flow Views
By default, navigation within either view does not affect the currently active row in the other view. This enables you to retain your place in one view while scrolling around in the other.
To switch between the two views, you can use any of the following methods.
-
View tabs.
As with any tabbed interface, if you select a tab, the associated view interface becomes active. When you return to the previous view, it remains positioned on the current or last selected node within the program when you switched. This is true whether you selected the item or just placed the cursor within an edit box.
-
View menu.
Select a section or step in the current view (note that selecting an action does not enable this functionality—you can only jump from parent nodes). Then select View, Jump to Program Flow or View, Jump to Definition, depending on the view that is currently active. When you select one of these commands, the focus of the target view depends on what you have selected in the previous view. For example, if you have section C, step 4 selected in Definition view, and you select View, Jump to Program Flow, section C, step 4 is the focus of the Program Flow window. If the selected item is in a program that is not already open, PeopleSoft Application Engine opens the appropriate program, then navigates to the requested node in the view window.
-
Pop-up menu.
The same commands as the View menu are also available from the pop-up menu.
Switching Within Program Flow View
While you are in Program Flow view, you can select these options from the pop-up menu:
-
Go to Next Reference
Select to switch to the next reference of a particular definition object. This helps you to quickly navigate through a program. For instance, if references to section C, step 4 appear three times because there are multiple calls to this object at runtime, you select Go to Next Reference to quickly and easily navigate to each reference, or call.
-
Jump to this Definition
Select to go directly to the definition node in Definition view that pertains to the current selection in the Program Flow view.
Using the Refresh Option
As you develop an Application Engine program, you may be inserting, renaming, and deleting definitions. In a large program, it can be easy to lose your place or become disoriented. The Refresh option reorders all the nodes for the current definition according to the following logic:
-
For standard program definitions, the MAIN section is always displayed first (Library program types do not contain a MAIN section because they contain only callable sections).
The remaining sections appear alphabetically by name, which makes it easier to locate a section within the program definition. The system, at runtime, executes sections through Call Section actions within steps, not by the order in which sections are defined.
-
Steps are never automatically reordered in Definition view, and, at runtime, they execute in the sequence in which you define them.
-
Actions are always logically reordered within a step, based on their action type, which defines their runtime sequence.
Note. When you save a modified definition, the system automatically refreshes the view.
PeopleSoft Application Engine inserts any delete requests for a given section into the current project, regardless of the Tools, Options setting in PeopleSoft Application Designer.
For example, suppose you delete a section node from the current Application Engine program, and then you reinsert a section node and rename it to the same name as the section you just deleted. The section object is not inserted into the project regardless of your Tools, Options setting. This is because a delete action already exists for this object. To resolve this situation, either manually remove the delete request before inserting the new copy request or manually reset the proper flags in the upgrade project that changes the action type from delete to copy.
Filtering View Contents
Section filtering options enable you to filter the current view so that you see only sections and steps based on specified criteria.
To enable or modify the filtering options, select View, Section Filtering. You can select from the following filtering options:
| Menu Command | Description |
| No Filtering | Select to see all objects in your program regardless of any section attributes, such as Market, Database Type, Effective Date, and Effective Status. |
| Default | Select to display the definition filter according to the default filtering criteria. If you change the value of any filter option and click OK, you have defined a custom filter. |
| Custom | Select to display the definition filter dialog box and define custom filtering options for the current view. |
Behavior of Section Filtering Options
When using the section filter options, consider the following:
-
The default is no filtering; therefore, all section definitions are included in this view.
-
If you select custom filtering, the default filtering options are displayed while you're in the current session of PeopleSoft Application Designer.
If you modify these filtering options and click OK, the new options are stored as the currently active options and the view is updated accordingly.
-
If you select the default filter option, the original default options appear in the dialog box.
After clicking OK, the view reappears with only those sections that qualify. However, if you change the default options and do not click OK, these options are stored as a custom filtering request and the view reappears as necessary.
-
If no platform-specific section is defined for the target filter value, the default (base platform) is always included, because this more accurately represents the PeopleSoft Application Engine runtime behavior.
If you select Section Filtering, Default, or Section Filtering, Custom, the following dialog box appears:
In this example, only definitions that represent the following criteria appear in Definition and Program Flow views.
| Market | Select a market code to see only the definitions within that market. To see all market-related definitions for a program, you could update the default profile, or define a custom filter, selecting (none) from the Market drop-down list box. In the illustration, sections pertaining only to the Italian market (market code ITA) are shown. |
| Platform | Select the platform filtering. In the illustration, sections that are defined only for the Microsoft SQL Server platform are shown. Select Default to display sections defined to be database-platform-independent (default platform). Specific platforms include DB2 UDB for OS/390 and z/OS, DB2/UNIX, Informix, Oracle, Microsoft, and Sybase. |
| As of Date | Select the date filtering. In the illustration, sections with an as of date equal to or greater than April 7, 2000 are shown. Select None to displays all sections regardless of effective date. |
| Active Status | Select to show active section definitions. |
Note. All filtering options pertain only to section-level nodes.
Printing Program and Flow Definitions
You can print the program definition or program flow depending on which view you are in when you select print.
To print an Application Engine program definition:
-
Right-click and select Print in either Program Flow or Definition view, or select File, Print.
-
Select print options.
Program ID
Select to print the whole program.
All Sections
All sections are expanded in printed report only for the primary Application Engine program being printed and only if that program is an application library. Otherwise, only the MAIN section, first section, or called section is printed.
All Steps
Select to print all the steps in the section.
All Attributes
Select to print all detail level attributes for the specified node and its children.
SQL Statements
Select to print, for every SQL type action, the text of each SQL statement.
PeopleCode Statements
Select to print the text of the PeopleCode statements for every PeopleCode action.
Comments
Select to print the long description comments for the selected node and its children.
Include External Calls
Select to print the section detail of all external calls.
Max No. of Levels(maximum number of levels)
Specify the maximum number of recursive levels to print for the specified call sections including both external section calls and internal section calls. This edit box is always enabled. The maximum number of levels can only be set to a value greater than or equal to 1.
Creating, Opening, and Renaming Programs
This section discusses how to:
-
Create new programs.
-
Open existing programs.
-
Rename programs.
Creating New Programs
To create a new program definition:
-
Select File, New or press Ctrl + N.
-
In the New dialog box, select App Engine Program from the Definition Type drop-down list box, and click OK.
-
Save and name your program.
Select File, Save As, enter the name of your program in the Save Name As edit box, and click OK.
Note. It's also important to provide a program description and specify its owner in the properties dialog box for the new program.
See Setting Program Properties.
Opening Existing Programs
To open an existing program:
-
Select File, Open.
-
In the Open Definition dialog box, select App Engine Program from the Definition Type drop-down list box.
-
Enter your search criteria for the program you want, select your program in the search results list box, and click Open to open the program.
Renaming Programs
To rename a program:
-
Select File, Rename.
-
In the Rename dialog box, make sure that App Engine Program appears as the definition type.
-
In the box that contains the results of your search, click the program that you want to rename.
-
Click Rename.
-
Place the cursor in the box that appears around the highlighted program name.
-
Enter the new name for the program.
-
Click Rename again, and respond appropriately in the Confirm Rename dialog box.
Note. The system automatically modifies all static references in other programs to the renamed program. For instance, if you call the renamed program from another Application Engine program, the Call Section action in the calling program is modified to reflect the new program name. All sections and steps are saved under the new name. Only one occurrence of a program name can exist for a given database.
Note. If the renamed program is called in a dynamic Do action, the reference is not automatically modified. You should also manually check and modify any embedded references to the new program name in CallAppEngine or other PeopleCode functions.
Copying or Moving Program Elements
The following procedures apply to sections, steps, and actions. Note that when these functions are performed for a given object, the result applies not only to the selected object, but also includes its defined children, if they exist. Also note that all references to menu items apply not only to the main menu bar items, but also to their related items in the context menu, where applicable.
To copy a definition:
-
Select the definition.
-
Select Edit, Copy.
-
Position the cursor where you would like to put the copied definition, and select Edit, Paste.
To move a definition:
-
Select the definition object.
-
Select Edit, Cut.
-
Position the cursor at the target location and select Edit, Paste.
Testing Application Engine Programs
After creating or modifying your program, you can test it while in PeopleSoft Application Designer in two-tier mode. You use the Run Request dialog box:
To run an Application Engine program in two-tier mode:
-
Select Edit, Run Program from the PeopleSoft Application Designer toolbar.
The Run Request dialog box appears.
-
Enter appropriate values.
When you click OK, these values are passed as runtime parameters to the initiated PeopleSoft Application Engine runtime executable.
Run Control ID
Enter the run control ID of the program that you are testing.
Run Minimized
Select to have the window of the requested process minimized when it is submitted to run.
Output Log to File
Select to write the output log to a file.
Log File Name
Specify the log file name (enabled only when Output Log to File is selected).
Process Instance
Specify the process instance for this run request, or use the default value of zero if an instance number is not needed.
-
Click OK.
Setting Program Properties
This section discusses how to:
-
Access properties.
-
Set general properties.
-
Set state record properties.
-
Specify temporary tables.
-
Set advanced properties.
Accessing Properties
When you have an Application Engine program open in PeopleSoft Application Designer, you can view and modify the properties assigned to an entire program just as you would a step or a section.
To view or modify the properties associated with a program, click the Properties button or select File, Definition Properties while the program is open. You can also press Alt+Enter. The Program Properties dialog box appears.
Setting General Properties
Access the Program Properties dialog box and select the General tab. You can specify identification values for your Application Engine program.
| Owner ID | (Optional) Enter the owner ID for the program. The owner ID is a way to identify which definitions are owned by which PeopleSoft applications, such as PeopleSoft General Ledger, Accounts Receivables, and so on. The values in the drop-down list box are Translate table values associated with the OBJECTOWNERID field. |
Setting State Record Properties
Select the State Records tab.
| Qualify Search | Enter any wildcard characters or complete table names to limit the results that appear in the record list. By default, the Record List box contains all record names that end with the extension AET. This extension identifies the record as an Application Engine record. |
| Get List | Click to populate the Record List box. |
| Record List | This text box contains the results of your state record search. |
| Selected | Select state records for use with a particular program. Click Add to include selected records from the record list into the selected list. Click Remove to remove selected records from the selected list. Indicate which state record to act as the default state record by selecting its check box. For your default state record, you need to reference only fieldnames in your PeopleCode and SQL (for the active program). When you reference a non-default state record, you do so by using recname.fieldname. |
Specifying Temporary Tables
Select the Temp Tables tab.
Temporary tables store intermediate results during a program run.
Note. You must have already defined required temporary tables in your database prior to associating them with an Application Engine program.
| Qualify Search | Enter any wildcard characters or complete table names to limit the results that appear in the record list. By default, the Record List box contains only records that are of type Temporary Table. You apply this attribute when you create the record in PeopleSoft Application Designer. |
| Get List | Click to populate the Record List box. |
| Record List | This text box contains the results of your search for temporary tables. |
| Selected | Select temporary tables for use with a particular program. Click Add to include selected records that appear in the record list. Click Remove to exclude selected records that appear in the selected list. |
| Instance Count | Enter the number of physical tables to be created for each dedicated table for this program during the SQL Build procedure in PeopleSoft Application Designer. Typically, you would set this number to equal the maximum number of parallel program runs that you anticipate. For instance if you expect up to five instances of the same program to run simultaneously, then you would set the instance count to 5. |
| Insert Selected List into Project | If the active Application Engine program definition belongs to a project, select to include the dedicated temporary tables for this program within the same project. |
| Runtime | Control how an Application Engine program behaves if an instance of its specified dedicated temporary tables is not available. If you select Continue, then PeopleSoft Application Engine uses the base version, or nondedicated version, of the temporary tables. If you select Abort, then the program exits with an error message. |
Note. If the table is keyed by PROCESS_INSTANCE, and the application SQL includes the process instance in the Where clause, then the table can be shared by multiple processes. The best performance, however, occurs when a program runs against a dedicated temporary table instance.
See Also
Using Temporary Tables
Setting Advanced Properties
Select the Advanced tab.
| Disable Restart | Select to disable the built-in restart capabilities for a particular program. |
| Application Library | In some cases, you may want a program to contain only a collection, or library, of common routines (in the form of callable sections) that you do not want to run as a standalone program. When sections are defined as public, other programs can call the sections, or routines, that exist in the library at runtime. Because this type of program is not designed to run as a standalone program, it does not require the MAIN section, or initial entry point. Select this check box to rename or remove any existing MAIN section. Note. An application library is the appropriate location to store a collection of shared Application Engine program sections. Libraries are not intended for storing a specific SQL action within a section. To share common SQL, use the SQL repository. |
| Batch Only | Select for batch-only programs. Batch-only programs are not executed from the CallAppEngine PeopleCode function. Any dedicated temporary table used for batch-only programs do not have online instances created. |
| Message Set | Specify the default message set value for this program. The system uses this message set value for all Log Message actions where the message set isn't specified. |
| Program Type | Select from:
|
Adding Sections
This section provides an overview of sections and discusses how to:
-
Insert sections.
-
Locate sections.
-
Set section properties.
Understanding Sections
A section comprises steps and is somewhat equivalent to a COBOL paragraph or a PeopleCode function. You can create sections that are platform-independent or platform-specific, intended for a particular market, and effective-dated.
Whenever you create a new program, you simultaneously create a section called MAIN. The MAIN section identifies the program's entry point so that it can be called by another program.
Section Execution Order
A section is unique based on the program and section names, and based on its intended database platform and effective date. You can also create unique market-specific sections. When you execute an Application Engine program, it executes sections based on the following order of precedence:
-
If a section for the current market exists, execute it.
Otherwise, execute the default GBL (global) market section.
-
If a section for the current platform, or database exists, execute it.
Otherwise, execute the default database platform section.
-
If multiple effective-dated sections exists, execute the section with the most recent effective date, based on the current (run) date.
For example, suppose you have two versions of a particular section: SECT01 for the Public Sector market and SECT01 for the Global market. If you request to run the public sector version of the program, PeopleSoft Application Engine executes the Public Sector version of SECT01. If the program is running on Oracle, PeopleSoft Application Engine then looks for an Oracle version of the SECT01 for Public Sector.
Inserting Sections
To insert a section:
-
Select Insert, Section, or right-click and select Insert Section.
The default name for a section that you insert is Section N, where N is an incremented number that attempts to provide a unique name for each section object. Unless you rename sections, the sections you add are named SectionN+1, where N is the last section you inserted. Consequently, you get names such as Section1, Section2, Section3, and so on.
The designer inserts the new section directly beneath the subordinate objects within the highlighted object's owning section. For instance, if Section2 were selected, then Section4 would be inserted between Section2 and Section3, rather than after Section3.
Note. Sections are always reordered alphabetically by name at save time to make it easier to locate a given section. However, order of execution is dependent on internal call section references, and is therefore independent of the order that sections are inserted and displayed.
-
Enter the remaining section property values.
-
Save the program.
Locating Sections
There are various methods to locate references to sections within an entire database as well as within a program.
Finding Call Section References
You can generate a list of all the references to a particular section. The list applies only to Application Engine programs defined within a single database.
To locate section references:
-
Open the program containing the shared, or called, section.
-
Select Edit, Find References.
-
The Find Definition References dialog box appears.
-
On the Call Sections tab, select the appropriate section from the Section name drop-down list box, or enter the name directly.
By default, the current program name and MAIN section appears in the dialog box.
-
Click OK.
-
In the output window, view the generated list.
The output window lists the programs and sections that call a particular program. This list also shows the total call references made to a particular section. Call sections within the current program appear first in the list.
Double-click an item in the output window list to automatically navigate the definition view to that calling section.
Finding Sections Within the Current Program
Within large and more complicated Application Engine programs, such as those upgraded from a previous release, it is not uncommon to have over a hundred sections. Rather than scrolling through a large program, use the Go To Section feature.
Note. This feature applies only to the current program.
To automatically navigate to a selected section:
-
Select Edit, Go To Section.
The Find Definition References dialog box appears.
-
On the Go To Section tab, select the appropriate section from the Section name drop-down list box, or enter the name of the section.
-
Click OK.
The Definition view scrolls to the first occurrence of the section with the name you selected.
Setting Section Properties
Controls that specify section properties are located in Definition view. For example, for each section included in your program, there is a node, as shown in the following example, from which you specify all of the attributes to associate with a particular section.
The values you specify at the section level generally apply to all the objects contained within that section.
| Section Name | Develop a naming convention and be consistent throughout your projects. You are limited to eight characters. |
| Market | Select the market for which the section is intended. If a particular market is irrelevant to your batch program, keep the default market value of Global (GBL). |
| Platform | Select the target database platform for which this section definition is to execute. Leave the default value for all sections whose defined actions are not specific to any given database platform. |
| Effective Date | To make a particular section effective-dated, enter the target date. |
| Effective Status | Specify whether a section is active, or enabled at runtime. |
| Section Type | In the case of an abnormal termination of the program, the value of this system field specifies whether you must restart the section. If a section controls a procedure that, if not run to completion, could corrupt or desynchronize your data, select Critical Updates. Otherwise, use the default value of Preparation Only. |
| Auto Commit | Select to specify the commit level for the section. You can have no commit or you can have PeopleSoft Application Engine commit after the step successfully completes. |
| Public | Select to enable a section to be called from another program. |
Adding Steps
A step represents the smallest unit of work that can be committed in a program. When you create a program, you have a default MAIN section and step, initially named Step01.
This section discusses how to:
-
Insert steps.
-
Set step properties.
Inserting Steps
To insert a step:
-
Highlight the section or step that you want to precede the new step.
For example, if you want the new step to be the first step in the section, select the section node. Otherwise, select the existing step that you want the new step to follow.
Note. The name of the section in which you insert the step appears to the right of the step description. In large programs, this enables you to determine the section in which a step resides, if the section is not in view. Also, note that a sequence number appears on each step (001, 002, 003, and so on) so that you can determine a step's order within a section. The sequence numbering for steps begins at 001 within each section.
-
Select Insert, Step/Action.
By default, the steps are given a default name of StepN+1 beginning with Step01. Rename the step to better define the type of actions this step contains.
Note. The designer continues to increment the step name until it has a unique step name within a section. If the designer is unable to create a unique name after 50 attempts, a new step is not inserted.
-
Specify a step name and the remaining values.
To rename the step name, position the cursor in the step name edit box and enter a custom name. Only accept the default name for building quick, simple programs and for training purposes.
Setting Step Properties
You set step properties in Definition view.
| Step Name | Enter a name (up to eight characters). |
| Commit | Specify the commit level for the step:
|
| Frequency | Enabled only when a step contains one of the following actions: Do While, Do Select, or Do Until. Enter the numeric frequency with which PeopleSoft Application Engine should commit. If non-zero, PeopleSoft Application Engine commits every N iterations, and then again after the last iteration. |
| On Error | Specify how PeopleSoft Application Engine should respond to an error at the step level. The On Error routine behaves the same for both SQL and PeopleCode actions. The program only terminates on errors, not warnings. Select from:
|
| Status | Select to activate a step. If the step is currently applicable to your program (and working) you'll probably want to keep it active. |
Note. The On Error property does not apply to compile errors (for example, specifying erroneous SQL statements). It checks only for execution-type errors. If your program has a syntax error, the program terminates.
Specifying Actions
This section provides an overview of actions and discusses how to:
-
Insert actions.
-
Set action properties.
-
Specify SQL actions.
-
Specify Do actions.
-
Specify PeopleCode actions.
-
Specify Call Section actions.
-
Specify Log Message actions.
-
Specify XSLT actions.
Understanding Actions
There are eight types of actions that you can include within a step, and a step can contain multiple actions. The actions you define for a step depend on the results that your program requires at each stage of execution.
The only mutually exclusive actions within a single step are Call Section and SQL Statement; you cannot add a Call Section action to a step that already contains a SQL Statement action and visa versa. You can include only one of each action type within a single step. Because there are eight types of actions, and two are mutually exclusive, the maximum number of actions a single step can contain is seven.
Action Execution Order
At runtime, the system evaluates actions by type and executes them within a strict hierarchy. For example, if both a Do When and PeopleCode action exist within a given step, PeopleSoft Application Engine always executes the Do When first.
The following diagram depicts the sequence and level of execution for each type of action:
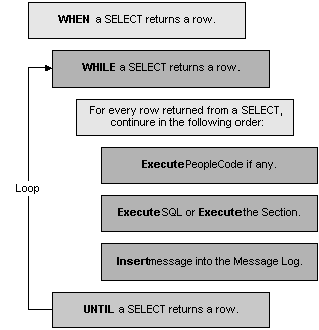
Action execution hierarchy
As you add actions to a step in the definition view, the actions are initially inserted after the selected definition (the owning step or a prior action). However, following a save request or a refresh of the view, the designer reorders all actions to match the execution hierarchy. This feature helps you visualize the sequence in which each step of your program logic executes.
Note. A SQL action and a Call Section action are interchangeable and mutually exclusive. Only one of these two actions can appear within a step.
Remember the following when inserting actions:
-
You cannot have more than one action of a specific type within the same step.
-
You cannot have a SQL action and a Call Section action within the same step.
-
You can only define XSLT type actions for programs defined as Transformation types (see the program properties).
Inserting Actions
To insert an action:
-
Highlight the step in which you want to insert the action.
-
Insert the action.
You do this using one of the following methods:
-
Select Insert, Step/Action.
-
Right-click the step and select Insert Step/Action.
-
-
Select the action type from the drop-down list box, or when current action type is selected, type the first character or so of the desired action type, then press Tab. The first (or only) type qualified by your entry is updated in this control.
-
Enter a description of the action.
-
Specify the appropriate properties for the action you selected.
Setting Action Properties
To modify action properties, you must have Definition view active. Because you can include a variety of actions within a step, there are different sets of properties specific to a particular action type. Depending on the action type you select, the properties that appear change.
For example, you can specify the reuse feature with a SQL action. This feature doesn't apply to a PeopleCode action; instead you need to specify how to respond to the PeopleCode program's return value.
The following illustration depicts how you can select action-specific properties for different action types.
PeopleCode and all SQL action types invoke the related PeopleTools Editor to define or maintain the related text.
ReUse Statement Property
The ReUse Statement property is available for all SQL action types (SQL, Do When, Do While, Do Until, Do Select). You use the ReUse Statement property to optimize the SQL in your batch program. ReUse Statement converts any %BIND references to state record fields into real bind variables (:1, :2, and so on), enabling the Application Engine runtime process to compile the statement once, dedicate a cursor, and then re-execute it with new data as often as your program requires. When you are using SQL or a Do action to process a large volume of rows, one at a time, inside a fetch loop, compiling each statement that you issue can be a considerable performance issue. ReUse Statement is a way to combat potential performance decreases.
Note. You can have PeopleSoft Application Engine recompile a reused statement by using the %ClearCursor function.
When setting the ReUse Statement option, choose between these values:
| Bulk Insert | When used in conjunction with statements like INSERT INTO tablename (field1, field2...) VALUES (%BIND(ref1), %BIND(ref2), the Bulk Insert feature offers the most powerful degree of performance enhancements related to the ReUse Statement feature. This option turns on ReUse Statement, and, in addition, it holds all the data in a buffer and performs an insert only after a large volume of rows has gathered in the buffer. The number of rows allowed to gather in the buffer depends on your database platform. Storing data in the buffers is applicable only if you've selected Bulk Insert and the SQL is an Insert statement. For statements other than Insert, the Bulk Insert option is ignored. |
| No | Select this option to disable ReUse Statement. With ReUse off, the Application Engine runtime process recompiles the SQL statement every time the loop executes. By default, ReUse Statement is disabled. |
| Yes | Select this option to enable basic ReUse Statement functionality. |
Note. The ReUse Statement property can offer significant performance gains. However, do not use it if %BIND variables are building parts of the SQL statement or are in the field list of a Select statement (this does not apply if you use the Static option in %BIND).
Specifying SQL Actions
This is the default action type for the first action within a given step. Use this action to perform the following SQL commands on multiple rows:
-
Update
-
Insert
-
Delete
-
Select
Note. Before you insert SQL (select View, SQL) into a SQL action within a new Application Engine program, you must have previously saved the program. This is required because the program name you use to save this definition is used to relate your program with the SQL objects you are about to create. The same is true for inserting PeopleCode.
With a SQL action, you use the SQL Editor to create and modify a SQL statement. Following are some examples of SQL statements:
%Select(AF_PERFM_AET.PREV_ASOF_DT) SELECT %DateOut(ASOF_DT) FROM PS_AF_FCST_SCHT%Bind(EPM_CORE_AET.TABLE_APPEND,NOQUOTES) WHERE AFDEFN_ID = %Bind(AF_CORE_AET.AFDEFN_ID) AND ASOF_DT = (SELECT MAX(ASOF_DT) FROM PS_AF_FCST_SCHT%Bind(EPM_CORE_AET.TABLE_APPEND,NOQUOTES) WHERE AFDEFN_ID = %Bind(AF_CORE_AET.AFDEFN_ID) AND ASOF_DT < %Bind(AF_PERFM_AET.ASOF_DT))
Note. If you intend to include multiple SQL statements within a single action, you should use the meta-SQL construct %EXECUTE. The previous sample SQL statement sample contains bind variables from a previous Application Engine action.
No Rows Property
In addition to the ReUse Statement property, the No Rows property is available for SQL actions. If the SQL (Insert, Update, or Delete) associated with the SQL action does not return any rows, you must specify what the Application Engine program should do.
For example, you could use this in a case where you insert into a temporary table, and then you intend to perform further operations on the inserted rows (provided that some rows meet the criteria). If the initial combination of Insert and Select statements provides no rows, you could save the program from having to reselect on the temporary table prior to executing another operation, or you could also prevent the program from performing set operations on the table when there won't be any qualifying rows.
When you set the No Rows property, you choose from the following values:
| Abort | The program terminates. |
| Section Break | PeopleSoft Application Engine exits the current section immediately, and control returns to the calling step. |
| Continue | The program continues processing. |
| Skip Step | PeopleSoft Application Engine exits the current step immediately and moves on to the next step. Application Engine ignores the commit for the current step at runtime. If the current step contains only one action, use Skip Step only to bypass the commit. |
Note. Using No Rows in conjunction with a Truncate Table operation is unreliable. Some database platforms report zero rows affected for truncations, regardless of how many rows were in the table.
Specifying Do Actions
There are four types of PeopleSoft Application Engine actions that, although distinct from the others, can be grouped together as:
-
Do When
-
Do While
-
Do Until
-
Do Select
Use these actions to control the execution of your program. With these action types, you can control the execution of subsequent sections, actions, or SQL statements depending on the results of a Do SQL statement in the form of a Select statement. If you were coding in COBOL, you would perform similar actions using the If and While functions.
Any of the Do actions can control the execution of a section, a SQL statement, a PeopleCode program, or a log message. For example, a Do Select can execute a SQL statement for each row returned by the included Select statement.
Do When
When using a Do When action, consider the following:
-
The Do When action is a Select statement that allows subsequent actions to be executed if any rows of data are returned.
-
This action is similar to a COBOL If statement.
A Do When statement runs before any other actions in the step. If the Do When statement returns any rows, the next action is executed. If the Do When conditions are not met, the remaining actions within that step are not executed. Your program executes a Do When action only once when the owning step executes.
-
The only property that you can specify for the Do When action is the ReUse Statement property, which applies to all SQL-based actions.
Do While
The Do While action is a Select statement that, if present, runs before subsequent actions of the step. If the Do While does not return any rows of data, the action terminates. The Do While is identical to the COBOL While statement. Subsequent actions within the step are executed in a loop as long as at least one row is returned by the Select statement for the Do While action. If the Do While does not return any rows, the step is complete.
The only property that you can specify for the Do While action is the ReUse Statement property, which applies to all SQL-based actions.
Do Until
A Do Until action is a Select statement that runs after each action when a step completes. If the Select statement returns any rows of data, the step terminates.
-
Use a Do Until action if you want the processing actions to execute at least once, and to execute over and over until a certain condition is true, such as until a Select statement returns some rows.
-
You can also use a Do Until action to stop a Do Select action prematurely.
For example, if the Select statement for the Do Until action does not return any rows, then the actions in the step are repeated (except if a Do When action appears in the step). Normally, a Do Select action continues until no rows are returned. If any rows of data are returned, the Do Select action stops and the step is not repeated.
-
The only property that you can specify for the Do Until action is the ReUse Statement property, which applies to all SQL-based actions.
Do Select
The Do Select action is a Select statement that executes subsequent actions once for every row of data that the Do Select returns. For instance, a Do Select can execute a SQL statement for each row returned from the Select statement. The subsequent actions within the step are executed in a loop based on the results of the Select statement. The type of the Do Select determines the specific looping rules.
Like the other Do actions, for the Do Select action you can specify the ReUse Statement property, which applies to all SQL-based actions.
In addition to the ReUse Statement property, you must also specify another Do Select property: Do Select Type.
Note. PeopleSoft Application Engine does not commit a step containing a Do Select action with the Select/Fetch option enabled until the entire step completes successfully, regardless of the other options you have selected.
For example, suppose at the step level, you specified to commit every 100 iterations of the step. One of the actions of this step is a Do Select with Select/Fetch chosen. Because PeopleSoft Application Engine does not checkpoint or commit while the Do Select is active, the transaction performed by the actions within a step is not committed until the entire step completes successfully. This is also true if any sections are called from inside the loop.
Do Select Type Property
When you specify the Do Select Type property in a Do Select action, you choose from the following values:
| Select/Fetch | PeopleSoft Application Engine opens a cursor for the Do Select action, then, within that cursor, PeopleSoft Application Engine performs a Fetch statement for each iteration of the loop to get each row from the Select statement. When a Fetch statement results in an end of table message, the looping is complete. You can't restart this type of Select statement, because PeopleSoft Application Engine does not perform a checkpoint or a commit within the step containing this action while Select/Fetch is running. Ultimately, your program ignores the commit settings at runtime until the outermost Select/Fetch completes. Note. When an Application Engine program is not set up for restartability, then commits are not controlled, monitored, or restricted by PeopleSoft Application Engine. When Restart is disabled, commits are controlled by the program. |
| Re-Select | For each iteration of the loop, PeopleSoft Application Engine opens a cursor and fetches the first row. Your program processes the first row returned from the Select statement. The cursor is reopened for each iteration of the loop. With this type of Fetch statement, you typically want some aspect of the loop to eventually cause the Select statement to return no rows. Otherwise, there is no mechanism in place by which to exit the loop. This type of Do Select is restartable. |
| Restartable | This option is similar to Select/Fetch in that PeopleSoft Application Engine opens the cursor associated with the Do Select action once, and then it performs a Fetch statement on each iteration of the loop to get each row from the Select statement. However, unlike the Select/Fetch option, you can restart this action, because PeopleSoft Application Engine performs a checkpoint in the middle of the step. PeopleSoft Application Engine treats this loop as if it is restartable, but it does not manage the restart. Make sure that the SQL you include within this action is such that, upon restart, the program recognizes where the previous run failed and where to restart processing. For example, you can employing a processed switch, or base the next Select statement on the key. |
Specifying PeopleCode Actions
Use this action type to insert PeopleCode within your Application Engine program. You can invoke the PeopleCode Editor directly from the designer interface to code your PeopleCode programs.
With a PeopleCode action, there is only one property that you can specify—On Return.
Use the On Return value to determine how your Application Engine program reacts based on the return of your PeopleCode program. The On Return setting takes effect if your PeopleCode program issues a "return 1" or "exit 1." You can use the True keyword in place of a non-zero numeric return.
When you specify the On Return property, you choose from the following values:
| Abort | The program issues an error and exits immediately. |
| Break | The program exits the current step and section, and control returns to the calling step. |
| Skip Step | The program exits the current step, and continues processing at the next step in the section. If this is the last step in the section, the calling step resumes control of the processing. |
Specifying Call Section Actions
Use the Call Section action to call another section defined in an Application Engine program. You can call a local section defined within your current program, and you can make external calls to a section defined in another Application Engine program.
The external section you intend to call must have its access property set to Public. If a section's access property is set to Private, that section can be called only from within the same program. By default, a section's access property is Private. If you attempt to make a call to a section that does not allow external calls, you receive an error message at runtime.
Note. You can call only programs that reside within the same database as the calling program.
Program ID Property
Because you can call sections defined in the current program or within external programs, you must first specify the program ID of the program containing the section you intend to call.
The default value is (current). If you call a section defined in another program, make sure that you first select the appropriate external program from the Program ID drop-down list box. The drop-down list box contains the names of all program definitions that currently exist in the database.
Section Name Property
Select from names defined in the program that appears in the Program ID list box. To call a section that is defined in an external program, select the program name in the Program ID edit box prior to selecting the section name.
Also use the Call Section action to call an entire external program. First select the program ID, then select section name MAIN. At runtime, this call executes the entire program defined by the value in the Program ID field.
Note. PeopleSoft Application Designer does not prevent you from calling the main section of the current program or the current section. For instance, Section1 can contain a step that has a local call section reference for Section1. This enables recursive calls, and should therefore be used with caution.
Dynamic Property
Use the AE_APPLID and AE_SECTION fields in the state record to execute different sections depending on the conditions a program encounters during runtime.
These two fields must be defined on the default state record for the program. If AE_APPLID is not present or is blank (at runtime), the current program is substituted for the AE_APPLID value. If AE_SECTION is not present or is blank, an error occurs.
When issuing a dynamic call, both the section and the program ID must be dynamically set. You enable a dynamic call by first having your program store different section names in the AE_SECTION field, and different program names in AE_APPLID field. The values you insert in these fields are normally based on various conditions met within your program. You then create a Call Section action that calls the section name defined in the state record field by selecting the Dynamic check box.
Selecting Dynamic automatically populates the AE_SECTION field with the symbolic value %Section, and the Program ID field with the symbolic value %AEAPPLID. At runtime, the program calls the section name stored in AE_SECTION that belongs to the program name defined by AE_APPLID.
Program Properties of Called Sections
When you call a section defined in an external program, the current program (the program containing the defined call section) defines the properties that apply to the running process. Suppose tracing is enabled for the current program, but tracing is disabled for the called program section. In this case, the called program has the trace option enabled at runtime because it inherits the calling program's properties.
For example, if program A calls program B, and program B calls program C, then the properties of A apply to both programs B and C. The calling program always controls the properties for the called program. In this case, program A controls the properties for program B, and because program B inherits the properties of program A, when program B calls program C, program A's properties also apply to program C.
Note. Although program properties are inherited, state records do not follow this inheritance model.
State Records of Called Programs
When you call a program from another program, the called program's default state record becomes active until processing returns to the initial program. However, all of the state records associated with both programs are available. State records that are common between the two programs share values. To communicate between the two programs, or share %BIND variables, define the same state records in both programs.
Specifying Log Message Actions
Use this type of action to write a message to the message log. The message log refers to the PeopleTools table (PS_MESSAGE_LOG) where execution messages reside. Any substitution parameters are written to PS_MESSAGE_LOGPARM. The following illustration shows a Log Message action:
You can use the Log Message action to insert any type of messages. Typically, a Log Message action writes error messages to the message log, but you could also write informational or status messages.
Note. You can also use MessageBox PeopleCode to populate PS_MESSAGE_LOG instead of using the Log Message action. This enables you to easily record errors encountered within Application Engine PeopleCode programs.
| Message Set and Number | Select the message defined in the message catalog. |
| Parameters | Enter values to insert in the log message. This field should be a comma-delimited list of values to substitute for the message variables (%1, %2, and so on) in the message text. These parameters can be hard-coded values or %Bind references. The information specified is inserted in the PS_MESSAGE_LOG at runtime, and any %Bind values are replaced by the current state record field values. You can then view the logged messages from the Process Monitor page. |
For example, using message set 1012, number 10, the message reads "The total number of %1 rows exceeds the control count value, %2," and you need the following parameters:
Invoice, %Bind(CONTROL_CNT)
Suppose you run this program with the CONTROL_CNT field value of 120. When the process ends, the following message would be included on the Process Details dialog box in Process Monitor: "The total number of Invoice rows exceeds the control count value, 120."
Specifying XSLT Actions
These are used for transform programs only.
See Also
Using XSLT for Transformation
Source: https://www.zutshigroup.com/PSOL/pt846/eng/psbooks/tape/htm/tape04.htm
0 Response to "Continue Searching if You Find a Loop Peoplesoft"
Post a Comment